Let me guess—you’re reading this while hunched over your laptop at the kitchen table, or maybe sinking into your couch with your computer balanced precariously on your knees. If your neck is already protesting just thinking about your current setup, you’re not alone.
When the world suddenly shifted to remote work, most of us cobbled together workspaces from whatever we had lying around. But here’s the thing: that “temporary” setup has probably become permanent, and your body is keeping score. That nagging backache, the stiff shoulders, the way your wrists feel after a long day of typing—these aren’t just minor inconveniences. They’re your body’s way of saying, “We need to talk.”
I’ve spent the last few years helping people transform their chaotic home offices into spaces that actually support their bodies instead of fighting against them. The best part? You don’t need a massive budget or a complete room makeover to make a dramatic difference in how you feel at the end of each workday.
Why Your Current Setup Is Probably Hurting You (And How to Fix It)
Before we dive into solutions, let’s talk about what’s actually happening to your body when you work in a poorly designed space. Ergonomics isn’t just a fancy corporate buzzword—it’s the science of designing workspaces that work with your body’s natural mechanics instead of against them.
Think of it this way: your body is an incredibly sophisticated machine that works best when everything is properly aligned. When you force it into awkward positions for hours on end, something’s got to give. Usually, that “something” is your comfort, your productivity, and eventually, your health.
The good news? Small adjustments can yield massive improvements. I’ve seen people eliminate chronic pain simply by raising their monitor a few inches or swapping out their kitchen chair for something that actually supports their spine.
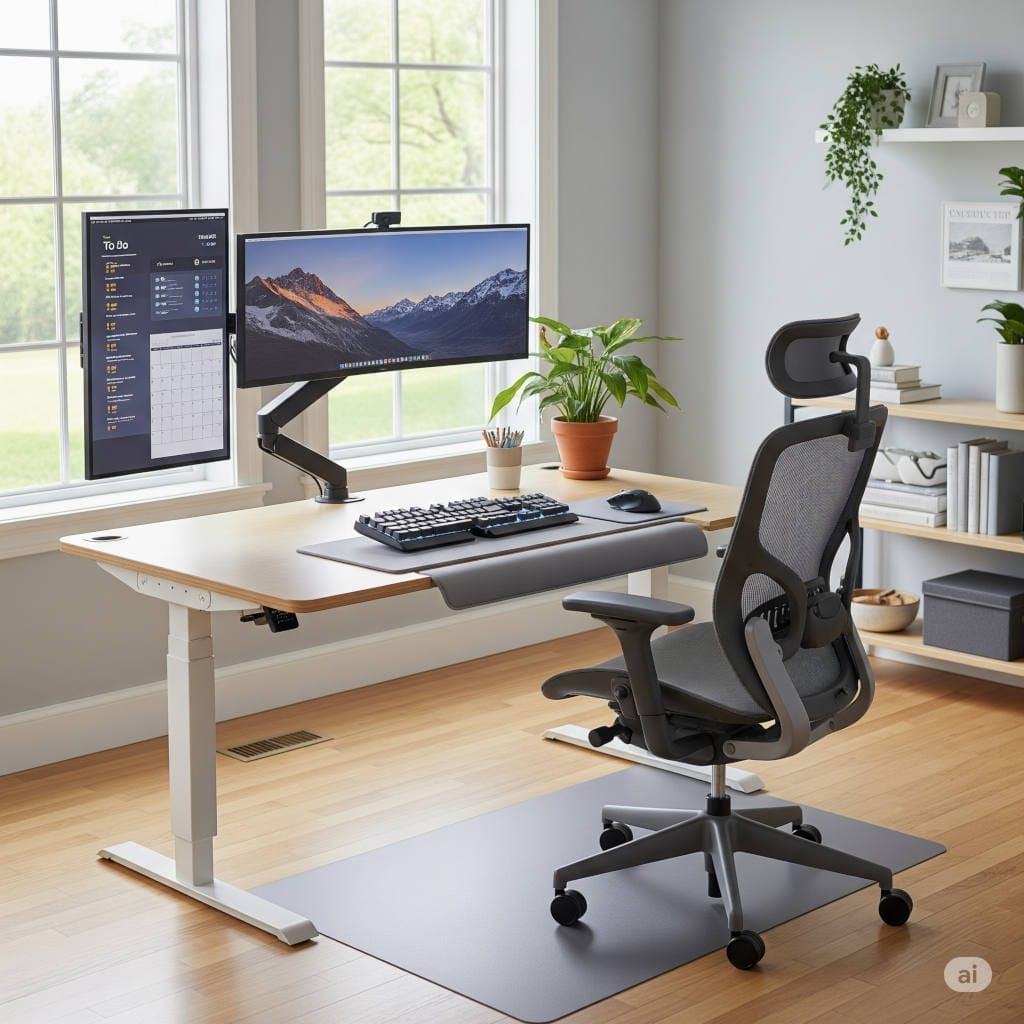
Your Chair: The Make-or-Break Foundation
Let’s start with the most important piece of the puzzle—your chair. I know, I know, everyone talks about expensive office chairs, but hear me out. You’re going to spend roughly 2,000 hours a year in this chair. That’s more time than you spend in your bed.
What makes a chair actually ergonomic:
Your chair should feel like it’s giving you a gentle hug, not fighting you for eight hours straight. The key features that matter most are adjustable height (your feet should sit flat on the floor without dangling), proper lumbar support that cradles the natural curve of your lower back, and armrests that let your shoulders relax.
Real product recommendations that won’t break the bank:
For those ready to invest: The Herman Miller Aeron or Steelcase Leap are gold standards, but they’re pricey. A more budget-friendly option that I consistently recommend is the Autonomous ErgoChair Pro or the IKEA Markus, which offers surprising support for its price point.
Already have a chair? Here’s how to upgrade it:
Not ready to buy new furniture? I get it. Grab a lumbar support cushion like the Everlasting Comfort Memory Foam Back Cushion, or even roll up a towel and tape it to your chair at lower back height. Add a seat cushion if your chair is too low—the Purple Double Seat Cushion is excellent, or you can use firm pillows in a pinch.
Desk Setup: Getting the Height Right (Finally)
Here’s where most people get tripped up. Your desk height directly determines whether you’ll end up with shoulder strain, wrist pain, or both. When you’re typing, your elbows should hang naturally at your sides, bent at about 90 degrees. Your wrists should float above the keyboard in a neutral position—not bent up, down, or to either side.
The reality check test: Sit in your chair and let your arms hang naturally at your sides. Bend your elbows 90 degrees. That’s where your keyboard should be. If your desk is too high or too low, you’re setting yourself up for problems.
Solutions for mismatched heights:
Desk too high? Raise your chair and add a footrest. The Humanscale FR300 is sturdy and adjustable, or you can use a small storage box filled with books for a DIY version.
Desk too low? This is trickier. You can add risers under the desk legs, or invest in a keyboard tray like the 3M Positive Locking Keyboard Tray that brings your typing surface to the right height.
Standing desk reality check: Everyone’s talking about standing desks, but here’s the truth—standing all day isn’t necessarily better than sitting all day. The magic is in variety. If you want to try a standing setup, the FLEXISPOT Standing Desk Converter lets you test the waters without committing to a full standing desk.
Monitor Positioning: Stop Torturing Your Neck
This is where I see the biggest mistakes, especially with laptop users. If you’re looking down at your screen, you’re creating a chain reaction of problems that starts with your neck and works its way down your entire spine.
The perfect monitor setup:
Your screen should be about an arm’s length away—roughly 20-24 inches from your eyes. The top of the monitor should be at or slightly below eye level. When you look straight ahead, your gaze should hit the top third of the screen.
For laptop users (this is crucial):
Laptops force you to choose between good screen position and comfortable typing, which is why laptop-only setups are ergonomic disasters waiting to happen. The solution is simple but requires a small investment: get a laptop stand and external peripherals.
If you’re ready to upgrade to a dedicated monitor, the sweet spot for most people is 24-27 inches. The Dell UltraSharp U2723QE offers excellent color accuracy and ergonomic adjustability, while the ASUS VA24EHE provides solid performance at a lower price point.
Keyboard and Mouse: The Details That Make All the Difference
Your hands and wrists do incredibly repetitive work all day. Small improvements in how your keyboard and mouse are positioned can prevent big problems down the road.
Keyboard positioning secrets:
Keep your keyboard close to your body—you shouldn’t have to reach for it. A keyboard tray can help if your desk doesn’t allow proper positioning. Your wrists should hover above the keys while typing, not rest on the desk or a wrist rest (save those for breaks between typing sessions).
When to consider an ergonomic keyboard:
If you experience any wrist discomfort, a split keyboard like the Microsoft Sculpt Ergonomic Desktop can make a significant difference by allowing your hands to maintain a more natural angle.
Mouse matters more than you think:
Your mouse should be at the same height as your keyboard and close enough that you don’t have to reach for it. If you experience wrist pain, consider a vertical mouse like the Logitech MX Vertical, which keeps your hand in a more natural “handshake” position.
Lighting: The Overlooked Game-Changer
Poor lighting forces you into awkward positions as you strain to see your work, leading to forward head posture and eye strain. The goal is even, adequate lighting that doesn’t create glare on your screen.
Screen glare solutions:
Position your monitor perpendicular to windows, not facing them or with your back to them. If glare is unavoidable, an anti-glare screen filter can help—the 3M Anti-Glare Filter for your specific monitor size.
Task lighting that works:
A good desk lamp eliminates shadows and reduces eye strain. The BenQ ScreenBar Plus is brilliant because it lights your desk without creating screen glare. For a budget option, the Pzloz Led Desk Lamps offers adjustable brightness and color temperature.
Building Your Setup: A Step-by-Step Action Plan
Here’s how to tackle this systematically, starting with the changes that will give you the biggest impact:
Week 1: Chair and posture fundamentals Adjust your current chair as much as possible. If it’s not working, this is where to invest first. Add lumbar support and ensure your feet are flat on the floor.
Week 2: Screen positioning Get your monitor or laptop screen to proper height. This single change eliminates most neck pain issues. If you’re using a laptop, this is when you add the stand and external keyboard.
Week 3: Fine-tuning peripherals Adjust keyboard and mouse positioning. Add a footrest if needed. Check that everything is within comfortable reach.
Week 4: Environment and habits Optimize lighting and establish movement routines. Set up reminders to change positions regularly.
The Movement Factor: Your Secret Weapon Against Stiffness
Even the perfect ergonomic setup can’t overcome the fundamental problem with desk work—too much sitting in any position. The solution isn’t complicated, but it does require building new habits.
The realistic approach to movement:
Forget the advice about getting up every 30 minutes—it’s not practical for most people’s work flow. Instead, aim for 2-3 minutes of movement every hour. Set a phone timer if you have to.
Micro-movements that work:
While working, regularly shift your weight, rotate your shoulders, and flex your feet. These tiny movements keep blood flowing and prevent muscles from locking into static positions.
Desk stretches that actually help:
Neck rolls, shoulder blade squeezes, and gentle spinal twists can be done right at your desk. The key is consistency, not intensity.
Red Flags: When Your Body Is Sending SOS Signals
Your body is incredibly good at adapting, but it’s also excellent at warning you when something isn’t working. Don’t ignore these signs:
Waking up with neck or shoulder stiffness that wasn’t there before you started working from home
Headaches that seem to coincide with work days
Wrist or hand numbness, especially at night
Lower back pain that gets worse as the day progresses
Eye strain or dry eyes by afternoon
These aren’t just “getting older” symptoms—they’re often direct results of poor ergonomics that can be fixed with the right adjustments.
Budget-Smart Upgrades: Maximum Impact for Minimum Investment
You don’t need to spend thousands to transform your workspace. Here’s how to prioritize your investments for maximum impact:
Start with the first category and work your way up as budget allows. The difference between a $30 laptop stand and hunching over your computer all day is genuinely life-changing.
Making It Stick: Turning Ergonomics Into Effortless Habits
The perfect setup means nothing if you don’t use it correctly. Building ergonomic habits is like learning any new skill—it takes conscious effort at first, but then becomes automatic.
Start with awareness: Check your posture a few times throughout the day. Are your shoulders relaxed? Is your head directly over your shoulders? Are your wrists straight?
Use technology to help: Apps like Stretchly (free) can remind you to take breaks, while Flux (also free) adjusts your screen’s color temperature based on time of day to reduce eye strain.
Adjust as you go: Your needs will change as you get used to your new setup. Pay attention to what feels good and what doesn’t, and don’t be afraid to make tweaks.
The Bottom Line: Your Health Is Worth the Investment
Here’s what I’ve learned after helping hundreds of people transform their home offices: the difference between a workspace that fights your body and one that supports it is often smaller than you think. Sometimes it’s just raising a monitor, sometimes it’s adding a $30 cushion to your chair.
But the impact? That’s huge. We’re talking about eliminating daily pain, preventing long-term injuries, and actually enjoying the time you spend at your desk instead of enduring it.
Your workspace should energize you, not drain you. It should support your productivity, not sabotage it with distractions like discomfort and fatigue. The changes I’ve outlined here aren’t just about preventing problems—they’re about unlocking your potential to do your best work while feeling your best while you do it.
Start with one change this week. Your future self will thank you for every adjustment you make today.

")


