Building your own PC is one of the most satisfying experiences a tech enthusiast can have. Whether you’re putting together your first gaming rig, a workstation for video editing, or a budget-friendly desktop for productivity, assembling a PC gives you complete control over performance, aesthetics, and budget.
But here’s the truth most beginners overlook — the right tools can make or break your PC building experience. Using the proper tools ensures your build goes smoothly, safely, and efficiently, without the frustration of stripped screws, damaged components, or messy cable routing.
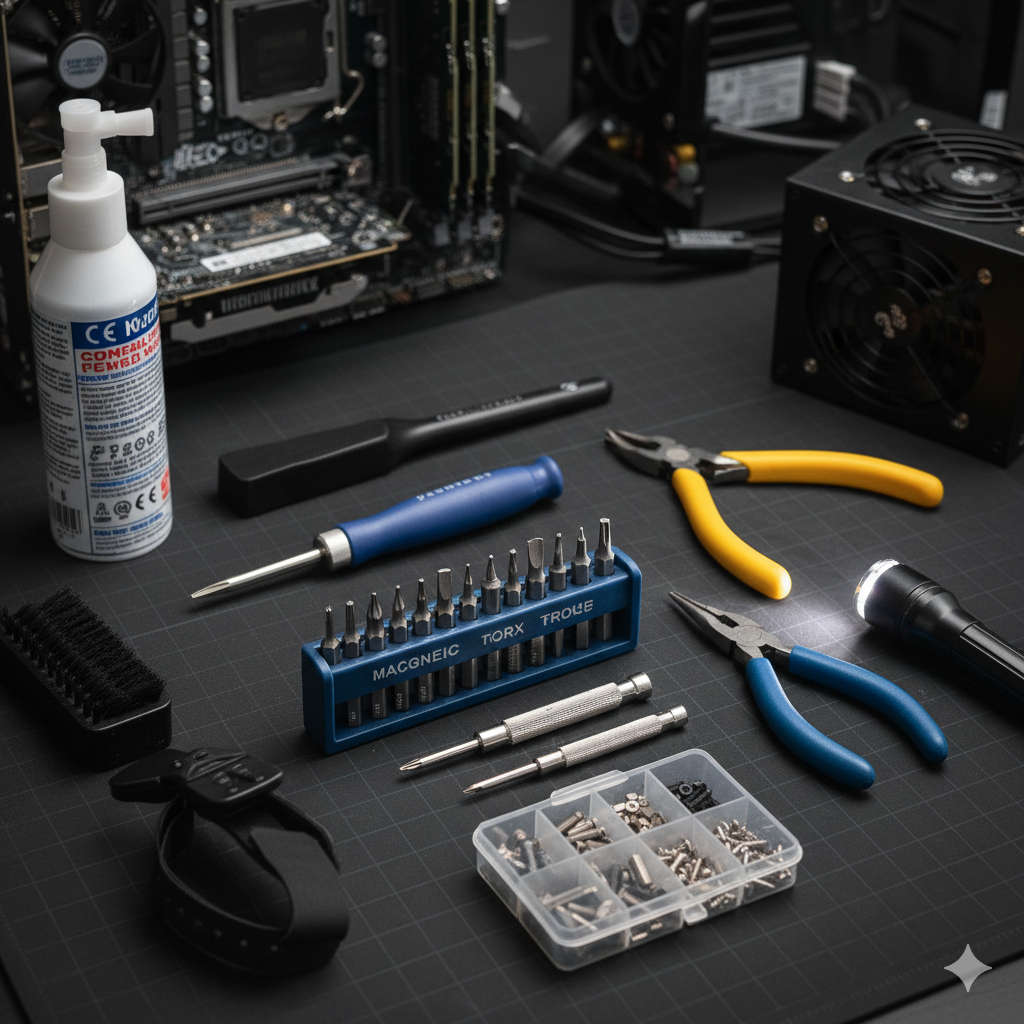
In this guide, we’ll explore every essential and optional tool you’ll actually need for PC building — from screwdrivers and anti-static wristbands to small organization hacks that professionals swear by. You’ll also get pro building tips, common mistakes to avoid, and a handy checklist at the end to keep you organized on build day.
Why Having the Right PC Building Tools Matters
Some people say all you need to build a PC is “a screwdriver and a clear desk.” Technically, that’s true — you can assemble a system with minimal tools. But anyone who has built more than one PC knows the difference between struggling with loose standoffs and breezing through a clean, professional-looking build.
Using the right tools:
- Saves you time and frustration.
- Prevents damage to expensive components.
- Keeps your workspace clean and safe.
- Makes future upgrades and maintenance much easier.
- Helps your build look cleaner and more organized.
Imagine building your dream gaming rig and dropping a tiny screw into the PSU shroud or scratching your motherboard because your screwdriver slipped. Having proper tools not only prevents such nightmares but also makes the process enjoyable from start to finish.
Essential PC Building Tools (The Must-Haves)
Let’s start with the absolute essentials — the core tools that every builder, beginner or expert, should have ready before unpacking the first component.
1. A Good Phillips #2 Screwdriver (Your Primary Tool)
If there’s one tool that’s completely indispensable, it’s the Phillips #2 screwdriver. This is the standard cross-head screwdriver that fits nearly every screw in a PC case, motherboard, and power supply.
Why It’s Essential:
- Used for mounting the motherboard to standoffs.
- Secures the power supply, expansion cards, and case panels.
- Fastens 2.5″ SSDs, HDDs, and most brackets.
- Handles fan screws and many accessory installations.
Pro Tip:
Choose a magnetized screwdriver with a comfortable grip handle. The magnetic tip keeps screws from falling into hard-to-reach areas, saving you time and frustration. Also, avoid applying excessive torque — snug is enough. Overtightening can strip threads or crack PCBs.
2. Phillips #1 or #0 Screwdriver (For Small Screws)
This smaller screwdriver comes into play for delicate components like M.2 SSDs, Wi-Fi antennas, and some cooler brackets.
Why It’s Important:
- M.2 SSD screws are tiny and can easily strip if you use the wrong size.
- Some cases and coolers use smaller screws for aesthetics.
- Helps in precise work without damaging threads.
Pro Tip:
Keep both #1 and #0 drivers handy. They’re inexpensive and will save you from hunting for a compatible tool mid-build.
3. Magnetic Screw Tray or Parts Organizer
When you’re knee-deep in screws and standoffs, organization becomes critical. A small magnetic tray or a multi-compartment organizer keeps all screws safe and easy to find.
Why It’s Essential:
- Prevents losing screws or mixing up different types.
- Keeps your workspace tidy.
- Saves time during assembly and troubleshooting.
DIY Alternative:
Don’t have a magnetic tray? Use an old egg carton or a muffin tin to separate screws by type and location (e.g., “Motherboard,” “Case Fans,” “GPU Bracket”).
4. Anti-Static Wrist Strap or Mat
Static electricity is invisible, but it’s a real threat to sensitive electronics. A simple spark that you don’t even feel can damage components like RAM, CPUs, or motherboards.
Why It’s a Must-Have:
- Prevents electrostatic discharge (ESD) damage.
- Keeps you grounded while handling parts.
- Adds an extra layer of safety, especially on dry or carpeted floors.
Pro Tip:
If you don’t have a wrist strap, just ground yourself by touching a metal part of your case before handling components. Always build on a hard, non-carpeted surface.
5. Bright Lighting or Headlamp
Good lighting isn’t just a comfort — it’s a necessity. Building a PC involves tight spaces, small connectors, and hard-to-see corners.
Why It Matters:
- Prevents mistakes with connector alignment.
- Helps with cable routing and hidden screws.
- Makes troubleshooting much easier.
Pro Tip:
Use a flexible desk lamp or an LED headlamp to keep your hands free while focusing light exactly where you need it.
6. Zip Ties or Velcro Cable Straps
Cable management is what separates an amateur build from a professional one. Not only does it make your system look clean, but it also improves airflow and cooling.
Why It’s Essential:
- Keeps cables from obstructing fans.
- Improves airflow and reduces dust buildup.
- Simplifies upgrades and maintenance.
Pro Tip:
Use Velcro straps for adjustable cable bundles and zip ties for permanent routes. Always cut off excess tie ends for a neat finish.
Nice-to-Have Tools (Make Your Life Easier)
The tools below aren’t strictly required, but they make the building process smoother, cleaner, and more efficient — especially if you plan to build more PCs in the future.
7. Hex/Nut Driver (5mm or 3/16”)
Some cases use hex-headed standoffs that may come loose while mounting the motherboard. A nut driver allows you to tighten or remove these safely.
Benefits:
- Prevents spinning standoffs that can damage your board.
- Helps in pre-securing standoffs before installation.
- Gives more control in tight areas.
8. Small Pliers or Adjustable Wrench
A pair of pliers comes to the rescue when you encounter stubborn screws, stripped heads, or spinning mounts.
Why You’ll Love It:
- Perfect for gripping standoffs or stuck parts.
- Helps remove stripped or misaligned screws.
- Ideal for cutting zip ties or small plastic pieces.
Pro Tip:
A set of precision needle-nose pliers gives better control and is small enough to fit inside compact cases.
9. Isopropyl Alcohol (90%+) and Lint-Free Cloth
Keeping components clean is vital for proper thermal performance and longevity.
Why It’s Useful:
- Removes old thermal paste from CPUs and coolers.
- Cleans fingerprints or dust from components.
- Ensures a clean surface for thermal compound application.
Pro Tip:
Avoid tissues or paper towels, which can leave fibers. Use microfiber or lint-free cloths instead.
10. Thermal Paste (High Quality)
While most coolers come with pre-applied thermal paste, enthusiasts often prefer to apply their own for better control and performance.
Why It’s Important:
- Ensures optimal heat transfer between CPU and cooler.
- Prevents overheating issues.
- Lasts longer if applied properly.
Pro Tip:
Use a pea-sized drop in the center of the CPU. When you mount the cooler, it spreads evenly across the surface.
11. Compressed Air or Electric Duster
Dust is the enemy of every PC. Before installing components or during maintenance, use compressed air to keep everything clean.
Benefits:
- Removes dust from case filters, fans, and heatsinks.
- Keeps components running cooler.
- Extends hardware lifespan.
Pro Tip:
Never use a household vacuum — static electricity from the hose can harm your components. Instead, use short bursts of compressed air from a distance.
12. Ratcheting or Electric Screwdriver
If you build PCs frequently, a ratcheting or powered screwdriver is a time-saver. It reduces wrist strain and speeds up repetitive screwing tasks.
Why It’s Worth It:
- Saves time when installing multiple screws.
- Consistent torque for better control.
- Ideal for professional builders or technicians.
Pro Tip:
Always finish the last few turns manually to avoid overtightening.
13. Tweezers or Magnetic Pickup Tool
Dropped a screw behind the motherboard tray? Tweezers or a small magnetic pickup tool can save you from taking everything apart.
Why You’ll Thank Yourself Later:
- Retrieves dropped screws from tight areas.
- Helps position tiny connectors or headers.
- Useful for intricate cable work.
14. Cable Comb or Cable Sleeving Kit
For enthusiasts who care about aesthetics, cable combs help align and separate sleeved PSU cables for that clean, Instagram-worthy look.
Why It’s Great:
- Organizes power cables into neat parallel lines.
- Improves airflow and accessibility.
- Adds a professional touch to custom builds.
15. Rubber Grommets and Washers
If you experience vibration noise from fans or drives, rubber grommets act as shock absorbers to reduce noise and protect components.
Benefits:
- Minimizes vibration noise.
- Prevents wear between metal parts.
- Helps in securing fans and drives quietly.
Step-by-Step PC Build Workflow (Using Your Tools Smartly)
Now that you know what tools to have, let’s walk through a build process to see how each comes into play.
Step 1: Prepare Your Workspace
- Choose a large, flat, and static-free surface.
- Avoid building on carpet; use a hard desk or table.
- Ground yourself or wear an anti-static wrist strap.
- Gather all your tools and parts before starting.
- Keep a magnetic tray handy for screws.
Step 2: Unpack and Organize Components
- Open each box and verify all parts are present.
- Sort screws by type and place them in separate compartments.
- Read the motherboard and case manuals briefly — they’ll tell you screw sizes and cable ports.
Step 3: Install CPU, RAM, and Cooler (on Motherboard)
- Place the CPU gently into the socket, aligning the triangle marker.
- Apply thermal paste if needed, then mount the cooler.
- Insert RAM sticks into the correct slots and press evenly until they click.
Tools Used:
Screwdriver (#1 or #2), isopropyl alcohol (for cleaning CPU), thermal paste, flashlight (for visibility).
Step 4: Install the Motherboard into the Case
- Align the I/O shield (if separate).
- Double-check that the standoffs are correctly positioned and tightened with a nut driver.
- Secure the motherboard with the screwdriver — don’t overtighten.
Tools Used:
Phillips #2, nut driver, magnetic tray, lighting.
Step 5: Power Supply and Drive Installation
- Mount the PSU in the case, ensuring the fan faces the correct direction.
- Route PSU cables neatly before connecting them.
- Install SSDs, HDDs, or M.2 drives securely with the smaller screwdriver.
Tools Used:
Phillips #1/#2, zip ties, Velcro straps, flashlight.
Step 6: Install GPU and Expansion Cards
- Remove the correct PCIe slot covers.
- Firmly insert the GPU into the PCIe slot and screw it in place.
- Connect power cables securely.
Tools Used:
Phillips #2 screwdriver, flashlight, cable ties, pliers (if covers are tight).
Step 7: Cable Management and Final Checks
- Route cables through the back panel, securing them with ties.
- Connect all front panel headers, fans, and power cables.
- Use your flashlight to double-check every connection.
- Make sure there are no loose screws or cables obstructing fans.
Tools Used:
Zip ties, Velcro, flashlight, tweezers.
Step 8: Power On and Test
- Connect your monitor, keyboard, and power cable.
- Turn on the system and check for POST (Power-On Self-Test).
- Enter BIOS to confirm that the CPU, RAM, and drives are recognized.
If everything works, close the case panels and enjoy your newly built machine!
Common PC Building Mistakes to Avoid
Even experienced builders make mistakes. Here are some of the most frequent errors and how to avoid them:
- Overtightening screws – Leads to cracked boards or stripped threads. Tighten only until snug.
- Poor cable management – Can block airflow and trap heat.
- Forgetting motherboard standoffs – Causes electrical shorts.
- Static electricity – Always ground yourself before touching components.
- Misconnecting front panel cables – Double-check polarity on LEDs and buttons.
- Using the wrong screws – Keep your screw types labeled to avoid damage.
- Forgetting BIOS update – Check the latest firmware for new CPUs or RAM support.
Expert Tips for a Cleaner, Easier Build
- Work Slowly: PC building isn’t a race; double-check each step.
- Label Cables: Especially modular PSU cables — label them for easier reassembly later.
- Keep Manuals Nearby: Motherboard and case manuals are your best friends.
- Use a Test Boot: Try powering on your system before cable managing everything. It’s easier to troubleshoot without the clutter.
- Take Photos: Document your cable routing — helpful when upgrading or fixing issues later.
Printable PC Building Tools Checklist
| ✅ | Tool / Item | Purpose |
|---|---|---|
| ☐ | Phillips #2 Screwdriver | Main screws for motherboard, PSU, and case |
| ☐ | Phillips #1/#0 Screwdriver | M.2 and small bracket screws |
| ☐ | Magnetic Parts Tray | Organizes screws and small parts |
| ☐ | Anti-Static Wrist Strap | Prevents electrostatic damage |
| ☐ | Bright Desk Lamp | Illuminates tight spaces |
| ☐ | Zip Ties / Velcro Straps | Cable management |
| ☐ | Hex/Nut Driver | Tightens standoffs |
| ☐ | Pliers / Adjustable Wrench | Removes stuck or stripped screws |
| ☐ | Isopropyl Alcohol & Cloth | Cleans CPU, cooler, and components |
| ☐ | Thermal Paste | For optimal heat transfer |
| ☐ | Compressed Air | Removes dust and debris |
| ☐ | Tweezers / Magnetic Pickup | Retrieves dropped screws |
| ☐ | Cable Comb | Organizes PSU cables |
| ☐ | Rubber Grommets | Reduces vibration noise |
| ☐ | Flashlight / Headlamp | Better visibility |
| ☐ | Clean, Flat Surface | Safe workspace |
Final Thoughts
Building a PC is part science, part art. With the right components and tools, anyone can create a powerful, personalized machine. But having the right PC building tools makes all the difference between a frustrating experience and a rewarding one.
Start with the essentials — a good screwdriver, anti-static precautions, and organization tools — then add optional items as you gain confidence. The investment is small compared to the peace of mind, performance, and satisfaction you’ll get.
When you’re ready to start your build, keep this guide handy. Remember: patience, preparation, and proper tools are your best allies. Happy building!
You might also like,
- 20 Common PC Building Mistakes to Avoid
- Top Budget Keyboards and Mice for Home Office in 2025
- Best Budget PC Build Under $800 for Content Creators in 2025
- Best Upgrades for a Budget PC in 2025: GPU, SSD, RAM & More
- SSD vs HDD: Which Should You Choose for Your PC Build in 2025
- Best Budget GPUs for 1080p and 1440p Gaming in 2025 | Top Affordable Graphics Cards
- Tech You Should Skip When Building a Budget PC Setup (Save Money on Smarter Choices)

")

 for Gaming & Productivity")

")